Tutorial R1 (R for Regina) written by Regina Grewe, also available in German on her website.Printing templates for hexagons and other regular patterns.The function "Regular Patterns" is used to create repeating patterns that fill a plane. A well known pattern of this type is "Grandma's Flower Garden", that uses hexagons. But there are others, that are often used for so-called Charm Quilts, where every patch has the same shape but uses a different fabric.
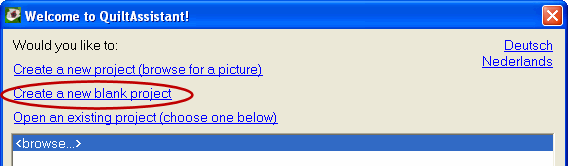
Creating the patternStart QuiltAssistant and choose "Create a new blank project".
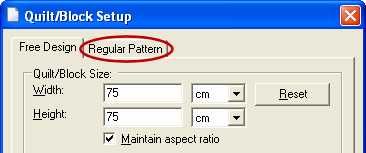
A further window appears, where you should click on the tab "Regular pattern".
A configuration dialog show. Choose a pattern from the list, that can be viewed by clicking on the small downward pointing arrow on the right of the "Pattern"-field. There are many patterns to choose from!
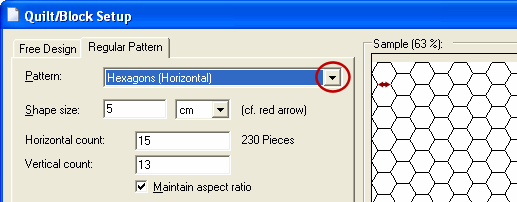
Let's assume you want to print templates for hexagons; choose those from the list and then set the size you want them to be. The small red arrow in the preview-window shows you which size is measured. After that, you should choose the number of hexagons (horizontal count and vertical count) in such a way that the result fits on a single sheet of paper. You should remove the checkmark before "Maintain aspect ratio" to get this right. Any values you change will be applied as soon as you select another field. Under "Quilt/Block Size" you can find the full size of the design; make it so that it fits a sheet of paper with some room to spare for margins (20 x 28cm for A4, 8" x 10.5" for Letter format). Then click "OK" to move on.

The design will show up in the main window. First save this file; use a name you can easily recognize, like "Hexagons_1_inch". Useful if you need any more sheets at a later time.
Now go on to "File -> Print". In the window that appears, choose the "Design"-tab and check the box marked "Show Shape Edges", and uncheck everything else. Then click on the "Quick Preview"-button below the preview on the right. This will show you what the printed sheet will look like. When everything is OK, click on "Print".

Together with the hexagons you will also get templates for the edge pieces. Normal printer paper (80 grams) will do to use as templates for paper piecing, but you can also print on heavier 160-grams paper or index cards.
Have fun snipping and sewing!
In the
next lesson we will play with regular patterns some more...

