Author Topic: Creating portrait  (Read 38556 times)

yvettem

  • Starting Stitcher
  • *
  • Posts: 7
    • View Profile
Creating portrait
« on: 22 April 2008, 19:12:25 »
How do I create a portrait?  This is what I'm doing -- I import the picture and choose regular pattern (squares).  I want to try and get as much detail as possible. So, should I choose 1 inch squares.  I can't figure out the rest.

I'd like the portrait to be at least 200 inches square.

mamia

  • Quirky Quilter
  • **
  • Posts: 61
  • this quilter loves cubism
    • View Profile
Re: Creating portrait
« Reply #1 on: 22 April 2008, 20:38:57 »
hello Yvette, I presume,
do you want to make the portrait all in squares? 200 inches or more seames really big for a portrait, I would think.
it's also possible to make a pattern with straight forms like the example of a flower in the quilt assistant.
this is the way I work, with straight or round seames.
you can have a look at a pattern that I made in the attachement.
lots of succes,
Mia

Arnout

  • Administrator
  • Perfect Piecer
  • *****
  • Posts: 169
    • View Profile
Re: Creating portrait
« Reply #2 on: 22 April 2008, 21:07:41 »
Hi Yvette, and welcome.

By 200 inches square I presume you mean the quilt should have approx. 200 inch-sized squares in it, and not, as Mia seems to think, a 200 x 200 " quilt (an altogether different challenge  :) ). You found the way to open a picture and go to the regular pattern dialog, so as an example, let's see what happens if I do this:


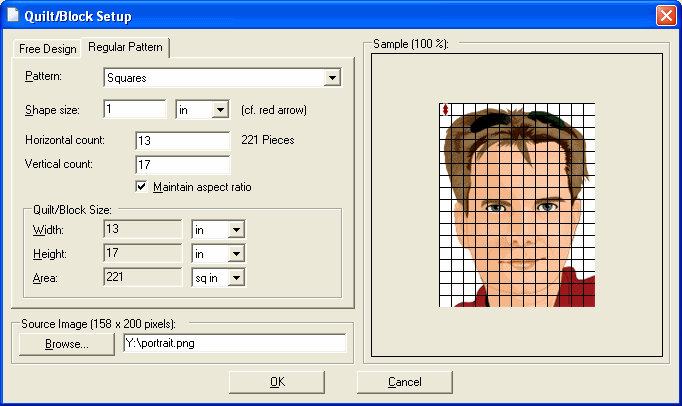
As you can see I chose 1" squares, 13 x 17 = 221 squares in total, and when I click 'OK' I get:


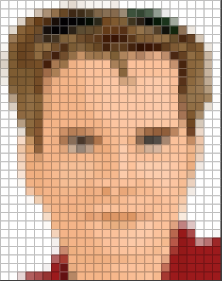
The next step would be for you to judge if this is enough detail, if you like the number of squares/size of the design, etc.  If not, just go to the Menu 'File' -> 'New' and try again, with different settings.
And if you do get something you like, the next step again depends on the way you want to do things. You may want to try to reduce the number of shades in the image, so you can use a limited selection of fabrics: menu 'Edit' -> 'Reduce Number of Colors'. Or you may want to add extra detail in certain by 'cutting up' individual squares. Or you could just print the design as-is and use it to rummage through you fabric stash (I presume you have one of those).

Let us know how you get on and if you need any more direction.

Best wishes,
Arnout

yvettem

  • Starting Stitcher
  • *
  • Posts: 7
    • View Profile
Re: Creating portrait
« Reply #3 on: 22 April 2008, 21:37:16 »
The finished product should measure 200 square inches -- 50 inches on each side.  In your example the quilt measures 13"x17".  In the picture I attached, I will convert it to black and white.

I'm doing the piece for a quilt challenge based on the Steven Speilberg film "Color Purple".

Lets fast forward to the finished piece.  Once I get all the settings right and end up 1000 squares -- how do I quilt it?  I assume I would have to have some kind of grid to place (fuse) the squares on.

Arnout

  • Administrator
  • Perfect Piecer
  • *****
  • Posts: 169
    • View Profile
Re: Creating portrait
« Reply #4 on: 22 April 2008, 22:12:16 »
OK, I kind of lost you on the maths, but if you're aiming for a 50 x 50" with 1000 squares in it, you would need 32 x 32 = 1024 squares, each sized 1 9/16" x 1 9/16" (let's round down to 1 1/2" => 48" for the quilt).

How you are going to put the squares together is a different story. Personally, I always follow a very traditional approach for my quilts, simply machine-sewing pieces of fabric together with a suitable seam allowance, but I'm sure you could use some foundation/fusing based technique as well.

Do you know Tammie Bowser? If not, you might want to look her up on the net, she wrote books about techniques for this kind of quilt.

yvettem

  • Starting Stitcher
  • *
  • Posts: 7
    • View Profile
Re: Creating portrait
« Reply #5 on: 22 April 2008, 22:22:47 »
I was going to order the Tammie Bowser software, but since Quilt Assistant does the same thing I will only get Tammie's book.

I was only estimating 1000 squares.  The minimum size of the challenge project has to be 50x50, but I can go a little smaller if I add borders.

mamia

  • Quirky Quilter
  • **
  • Posts: 61
  • this quilter loves cubism
    • View Profile
Re: Creating portrait
« Reply #6 on: 22 April 2008, 23:10:09 »
hi Yvette and Arnoud,
oooow now I know what's meant! I see I have to learn a lot in reading english numbers and using the quilt assistant  ;D
it looks very interesting to draw a quilt like this; I sure will try sometime.
lots of success for the contest for you Yvette!
good night,
Mia

yvettem

  • Starting Stitcher
  • *
  • Posts: 7
    • View Profile
Re: Creating portrait
« Reply #7 on: 21 May 2008, 14:42:03 »
Mamia

What a pretty portrait!  Is this an original drawing?  Can you provide tutorial?

mamia

  • Quirky Quilter
  • **
  • Posts: 61
  • this quilter loves cubism
    • View Profile
Re: Creating portrait
« Reply #8 on: 21 May 2008, 23:47:56 »
hello yvette,
this is a portrait made by modigliani. i wish i could paint like this.....  ;)
i use all kinds of paintings found on the internet to make patterns like this. to draw them i use the quilt assistant made by arnout  8).
i am practicing sewing curves on the the machine, wich is pretty heavy to do, especialy the s-curves. for that reason i draw patterns with curved pieces and i work with freezerpaper.
good night mia

yvettem

  • Starting Stitcher
  • *
  • Posts: 7
    • View Profile
Re: Creating portrait
« Reply #9 on: 23 May 2008, 16:09:12 »
Do you have a photo of one of your finished pieces? 

mamia

  • Quirky Quilter
  • **
  • Posts: 61
  • this quilter loves cubism
    • View Profile
Re: Creating portrait
« Reply #10 on: 24 May 2008, 19:32:36 »
hi Yvette,
no, i don't have one yet. but if you are interested you might look at the site of one of my favorite quilters  8) Ruth B Mcdowell
http://www.ruthbmcdowell.com/clients/rbm/home.html. she creates wonderfull pieces! this is the way i work.
have a good day,
Mia

mamia

  • Quirky Quilter
  • **
  • Posts: 61
  • this quilter loves cubism
    • View Profile
Re: Creating portrait
« Reply #11 on: 25 May 2008, 22:10:32 »
hi Yvette,
did you take a look at the site of Ruth McDowell? this is -in short- her way of working:
she makes drawings and when she is satisfied, she copies it to freezerpaper. she divides them in sections so that she is able to sew them on the machine. after cutting the paper she irons all the pieces on carefully chosen fabrics. the rest you know for sure.
bye Mia

yvettem

  • Starting Stitcher
  • *
  • Posts: 7
    • View Profile
Re: Creating portrait
« Reply #12 on: 25 May 2008, 23:43:14 »
How did you draw the curves in the portrait?  I have the tutorial for drawing paper piecing by Arnout, but I can't figure out the curves.  I looked at Ruth's website, but didn't see a description of her technique.  I have used freezer paper before.

yvettem

  • Starting Stitcher
  • *
  • Posts: 7
    • View Profile
Re: Creating portrait
« Reply #13 on: 26 May 2008, 01:05:54 »
How do I get QA to separate the colors?

mamia

  • Quirky Quilter
  • **
  • Posts: 61
  • this quilter loves cubism
    • View Profile
Re: Creating portrait
« Reply #14 on: 26 May 2008, 23:09:41 »
hello Yvette,
my tutorial will not be nearly as good as arnoutīs :-\, but iīll try: i think it's rather difficult to tell you in english.....my computer talks dutch ;D....
when you start QA choose start new project, then free design, then choose the mesures you want and a picture you like.
then you pick the lines you want to make: straigt, round 1/4 or 1/2 round ect., above left. than draw the lines on the picture.
you can start with a simple picture. always remember you have to sew it piece by piece: make sections you can put together and than put the sections together.
when i read it now, i think this text might by very confusing. let me know what's not clear and i try to help you. and than, when there is a library in your neigbourhood, you might find one of the books of Ruth, so you can see how she does it. her books are very helpfull to me.
bye, Mia